2.23.2013

Skype App2App notes


Want to share several notes that I did during development of communication protocol for my robot using Skype App2App.

Lets assume we have 3 skypes running (or skypekits):

  1. UserA logged on PC1
  2. UserA logged on PC2 (yes, same user, but on different machine)
  3. UserB logged on PC3

All accounts create application TestApp1. And now when:

Action Streams Datagrams Comments
UserA - PC1 UserA - PC2 UserB UserA - PC1 UserA - PC2 UserB
UserA-PC1 connects to UserB UserB:1 - UserA:1 - - - -
UserA-PC1 disconnects UserB - - - - - - The same result will be in opposite case, when UserB disconnects UserA-PC1.
UserA-PC1 connects to UserB again UserB:2 - UserA:2 - - - Numeration of streams increasing.
Restart skype on UserA-PC1 and connect to UserB again UserB:1 - UserA:3 - - - Numeration of streams done on each client app independently.
UserA-PC2 connects to UserB UserB:1 UserB:1 UserA:2 UserA:3 - - - -
UserB sends datagram to UserA-PC1 UserB:1 UserB:1 UserA:2 UserA:3 data - - Datagram sent per stream.
UserB sends datagram to UserA-PC2 UserB:1 UserB:1 UserA:2 UserA:3 - data - -
UserB goes offline (by user action) UserB:1 UserB:1 - - - - Need to clear streams on UserA sides.
UserB goes online and reconnects to UserA UserB:1 UserB:2 UserB:1 UserB:2 UserA:4 UserA:5 - - - Application and numerations preserved. UserB:1 streams exists but not functioning.
UserB deletes application without disconnecting UserB:1 UserB:2 UserB:1 UserB:2 - - - - Now we have 2x2 orphane streams.

That's it, now it is straightforward that when skype gives you array of streams you should use all of them for communication and send messages in cycle to each stream. There can be mix of orphane and live streams, and if you take from array only first it could be not functioning in multiple reconnection scenarios.

1.16.2013

Atmel Studio for Arduino-guys - Part1 (continued): precompile Arduino libraries


Hi, today we will talk about precompilation of Arduino libraries in Atmel Studio 6 and how to use precompiled libraries in your projects. You should create and cofigure new project, add required files, compile... and that's all! All steps was described in part 1. But I prepared for you quick action list which you could follow to create precompiled Arduino Servo library. When you will be familiar with steps, you could easily create projects for other libraries like Wire and SPI.
  1. Create new project: Ctrl+Shift+N or right click on solution -> Add -> New project..., select 'GCC C++ Static Library Project' and name it Arduino.Precompiled.Servo. Also in 'Solution:' drop down check that 'Add to solution' item selected.

  2. Remove files automatically added to project: select file Arduino.Precompiled.Servo.cpp in solution explorer and press Del or right click on file and select Remove. If asked, press "Delete" button to delete file permanently.

  3. Add required files to project - in our case add as links 2 files Servo.cpp and Servo.h from (SolutionDir)\arduino-1.0.3\libraries\Servo.

  4. Configure project - Build tab: press right click on project, select Properties, goto Build tab. Set "Artifact Name" to libarduinoservo for all build modes.

  5. Configure project - Build events: add post build event to copy resulting library to external folder. It is optional step, but sometimes useful...
    xcopy "$(OutputDirectory)\$(OutputFileName)$(OutputFileExtension)" "$(SolutionDir)$(SolutionName).$(Configuration)\" /f /y
    

  6. Configure project - Toolchain - AVR\GNU C Compiler: as we have only cpp files in our project, we could skip configuration of AVR\GNU C Compiler.

  7. Configure project - Toolchain - AVR\GNU C++ Compiler - Symbols: (both build modes)
    1. F_CPU=16000000L
    2. ARDUINO=103
    3. USB_VID=null
    4. USB_PID=null
    5. __AVR_LIBC_DEPRECATED_ENABLE__

  8. Configure project - Toolchain - AVR\GNU C++ Compiler - Directories: (both build modes)
    1. ../../../arduino-1.0.3/hardware/arduino/variants/mega
    2. ../../../arduino-1.0.3/hardware/arduino/cores/arduino

  9. Configure project - Toolchain - AVR\GNU C++ Compiler - Optimization:
    1. Release build mode: in Other flags textbox add text '-fdata-sections', and check Prepare functions for garbage collection
    2. Debug build mode: no changes

  10. Configure project - Toolchain - AVR\GNU C++ Compiler - Miscellaneous: in Other flags textbox add text '-fno-exceptions' in both build modes.

  11. Configure project - Toolchain - AVR\GNU Linker - Libraries: in this project we can skip it, but usually you should add name of used libraries to 'Libraries' section and path to folder where libraries located to 'Library search path' section. Name of the library should be added without 'lib' prefix like: arduinocore and not libarduinocore. Also do that in both build modes, or you could use different paths\libraries for different build modes.

  12. Configure project - Toolchain - AVR\GNU Linker - Optimization:
    1. Release build mode: check 'Garbage collect unused sections' and 'Relax Branches'
    2. Debug build modes: skip

  13. Also, sometimes you create projects that have dependencies on libraries produced by other project in same solution. In such case you should correctly setup dependencies to prevent situations when dependent project building before depending. To do this right click on project, select 'Project Dependencies...' and check required project(s), so Atmel Studio will have an ability to calculate correct build order.
You are almost done, just build and check existence of libarduinoservo.a in Arduino.Precompiled.Release folder (or in Arduino.Precompiled.Debug folder, depending on what build mode you used). That's it... You created precompiled Arduino Servo library!

Video below provides quick demo about how to use precompiled Arduino Wire library in Atmel Studio 6:

1.07.2013

Atmel Studio for Arduino-guys - Part1: precompile Arduino core

Introduction


Hello everybody!

I'm back to my blog with several interesting articles. Now I'm working on telepresence robot, actually I'm using it from 04/12 and doing improvements all the time. Well.. long story short - my mother survived a stroke and now as a reault she has troubles with health, so I need an ability to stay at home, but I'm working at Betsson Tech in Kiev and it is nearly 400km from home. I love, yeah.. really love, my job so after discussion with management I had an approval to work remotely from home (thank you very much guys!).

It is cool, but new trouble arised - I need an ability to attend daily standups, plannings etc in Betsson Tech in Kiev. That is how idea to create telepresence robot arised. I'll write about the robot with some video and description of social aspects of using such a telebot in one of the future articles.

And today I want to start serie of articles about using Atmel Studio 6 with Arduino Mega 2560 development board. The Plan is to write about:

Part 1. Common project configuration + precompilation of Arduino Core and some Libraries
Part 2. freeRTOS for Arduino
Part 3. Google Protocol Buffers for Arduino + STL
Part 4. NanoPB for Arduino

So, lets start.

Common project configuration + precompilation of Arduino Core


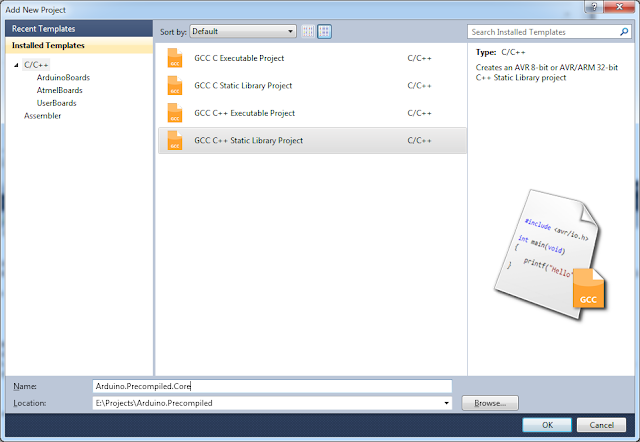
First of all you need to download and install Atmel Studio 6. Then create a solution named Arduino.Precompiled (File -> New project... -> Atmel studio solution -> Blank Solution) and one static library named Arduino.Precompiled.Core (Right click on solution in Solution Explorer -> Add -> New project):

Create new project
Create new project

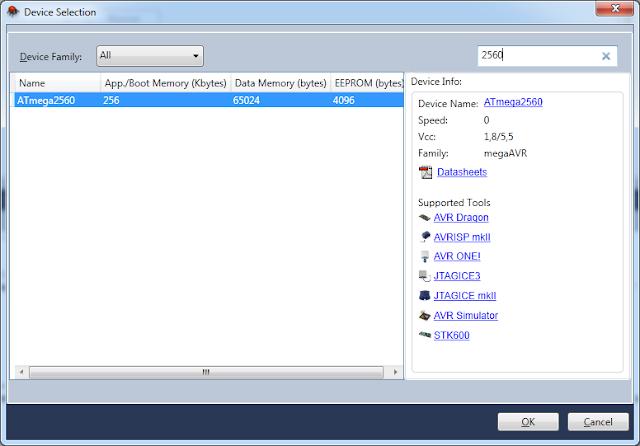
Then you will be asked to select your device. I'm using Arduino Mega 2560 board with MCU ATmega2560:

Select device
Select device
Press OK and now you have created your first project for AVR MCU in Atmega Studio! Now, lets add Arduino core files. To do this you need to download and unpack Arduino Software package (press on link for Windows). I unzipped package at the same level where Arduino.Precompiled folder located. Now go to Solution Explorer, right click on project and select Add -> Existing Item.. Go to the folder where all core files located: <arduino>\hardware\arduino\cores\arduino\ (see image below):

Add core files
Add core files
Select all files (Ctrl+A) and from drop down menu select Add As Link. When doing so you will add all selected files to your project as links, without physically copying them to project folder as Add does. Now lets do some configuration to our project. Need to say that configuration options I took from logs from Arduino IDE. So, right click on project -> Properties:

Set library name
Set library name
On Build tab you could set file name of your library, I named it libarduinocore. Please don't forget to do this for all configurations. Also, seems like Atmel Studio have some bug with saving properties for all configuration, so please recheck that name was really changed for both configuration by selecting Release and then Debug from drop down and checking actual Artifact Name.

Now go to Build Events tab:

Setting post-build event
I configured copy of resulting static library to Arduino.Precompiled.Release or Arduino.Precompiled.Debug folders located in solution folder, depending on build mode. Just to separate concerns...

Now we are ready to configure our Toolchain. Go to Toolchain tab, and select Symbols item for C or C++ compiler:

Configure toolchain: symbols
I configured both C\C++ for all configurations, all symbols I took from Arduino IDE logs:
  1. F_CPU - frequency of MCU you use. In case of Arduino Mega 2560 it is 16MHz or 16,000,000 Hz.
  2. ARDUINO is for version of Arduino framework, as you can see I use 1.0.3. Used for examle in Firmata library. But in our case it is optional and you can skip this definition at all.
  3. USB_VID and USB_PID is for vendor ID and peripheral ID, we are not using it. You can search for actual values in USBCore.cpp.
  4. __AVR_LIBC_DEPRECATED_ENABLE__ - use this definition to prevent compilation errors with Arduino libraries. Sorry, had no time to dig into it...
Next configure include directories (all configurations too):

Configure toolchain: directories
In case you use another board, not Mega 2560, choose appropriate subfolder in variants folder.
Now we are ready to configure optimization section for Debug and Release modes separately:

Configure toolchain: optimizations
And finally in Miscellaneous section add -fno-exceptions option:

Configure toolchain: miscellaneous

With compillers we done, and now we should configure linker. Only in Release mode do next:

Configure toolchain: linker
It looks like long and, may be, complicated, but after 2-3 projects you will do this configuration in 2-3 minutes. Description of all compiler and linker options you can find on official GCC site. Also, for AVR specific things you could visit AVR Libc site.

So, we are nearly done. Just remove unneccessary file that Atmel Studio created automagically:

Remove unneccessary file
When asked, press 'Delete' to permanently delete this file from your disk. Now you can try to compile... If you will see that output file is still named not like libarduinocore.a you can try next:
  1. Right click on project and choose Unload Project
  2. Right click on project and choose Edit Arduino.Precompiled.Core.cppproj
  3. Change your project file as shown on the image below:
Change name of library in project file
After you done, just right click again and choose Reload Project. Thats it, now you have precompiled arduino static library in your Arduino.Precompiled.Release and\or Debug folders:

Library in the folder
And here is small video that show you how to create project with precompiled Arduino Core library in Atmel Studio 6:


And here is flushing and testing:


Do you noticed memory statistics in the log? It shows how much you program takes in Flash (Program Memory Usage) and in RAM (Data Memory Usage). So make sure that Data Memory Usage is not more than you board can handle. For Arduino Mega it is 8KB.

Also I'm using avrdude to flush program into board, here is contents of flush.cmd:
c:\Users\User1\Downloads\arduino-1.0.1\hardware\tools\avr\bin\avrdude.exe -CC:\Users\User1\Downloads\arduino-1.0.1\hardware\tools\avr\etc\avrdude.conf -p m2560 -c wiring -P COM4 -b 115200 -F -U flash:w:%1%:i
pause

That's all for today. Next article will be about precompiling Arduino Libraries.

6.14.2012

Lost and found headers and identity for WCF service


If you are aware where is your headers and identity that were specified in config file and disappeared during runtime, check may be you are assigning an endpoint address form the code.

Look at EndpointAddress on MSDN. You can see 2 interesting properties there: EndpointAddress.Headers and EndpointAddress.Identity. This properties will be loaded from configuration you set in config file. So, when you want change endpoint address at runtime, make sure you copied headers and\or indentity from old instance:

var endpointAddress = new EndpointAddress(newUri, client.Endpoint.Address.Identity, client.Endpoint.Address.Headers.ToArray());
client.Endpoint.Address = endpointAddress;

Or, you can use reflection and extension method:

internal static class EndpointAddressExtensions
{
    private static FieldInfo uriField = typeof(EndpointAddress).GetField("uri", BindingFlags.NonPublic | BindingFlags.Instance);
 
    public static void ChangeUri(this EndpointAddress self, string uri)
    {
         uriField.SetValue(self, uri); 
    }
}

// ... in your code:

client.Endpoint.Address.ChangeUri(newUri);

But if last method is more elegant, you can't be sure that next update from Microsoft leave private field uri unchanged.

PS: code provided in article were written from scratch, so may be not free from minor issues

HTH


Shout it

kick it on DotNetKicks.com

How to troubleshoot SSL\TSL or x509 Certificate Validation in .NET


Hello,

if your SSL\TLS connection does not work, or establishing is very slow and you don't know what to do, this post is for you. There is a lot of text and links, and no images. So, be strong.

In my case there was method that takes 15-30s to establish connection:
HttpWebRequest.GetRequestStream()

To troubleshoot this, or other SSL\TLS issue start with enabling network tracing in configuration file. You can do this just add next several lines to <configuration> section of your config file (How to: Configure Network Tracing):
<configuration>
  <system.diagnostics>
    <sources>
      <source name="System.Net" tracemode="includehex" maxdatasize="1024">
        <listeners>
          <add name="System.Net"/>
        </listeners>
      </source>
      <source name="System.Net.Sockets">
        <listeners>
          <add name="System.Net"/>
        </listeners>
      </source>
      <source name="System.Net.Cache">
        <listeners>
          <add name="System.Net"/>
        </listeners>
      </source>
    </sources>
    <switches>
      <add name="System.Net" value="Verbose"/>
      <add name="System.Net.Sockets" value="Verbose"/>
      <add name="System.Net.Cache" value="Verbose"/>
    </switches>
    <sharedListeners>
      <add name="System.Net"
        type="System.Diagnostics.TextWriterTraceListener"
        traceOutputOptions="DateTime, ProcessId, ThreadId, Callstack"
        initializeData="d:\temp\network.log"
      />
    </sharedListeners>
    <trace autoflush="true"/>
  </system.diagnostics>
</configuration>

Please note traceOutputOptions attribute, it is very useful. Full list of options available on MSDN.
If you troubleshoot on production environment, do not forget to turn off logging after you reproduce the error. Now analyse your log file. For example I found next few lines:

System.Net Verbose: 0 : [28516] HttpWebRequest#21454193::GetRequestStream()
    DateTime=2012-05-23T15:10:23.9141803Z
    Timestamp=289843104974
System.Net Error: 0 : [28516] Can't retrieve proxy settings for  Uri 'https://www.example.com/tempuri/default.asx?a=1'. Error code: 12180.
    DateTime=2012-05-23T15:10:26.5350475Z
    Timestamp=289849567756

It takes 2sec to find proxy. But since I have no proxy, I disabled it for application. Just add to the <configuration> section next few lines:

<system.net> 
 <defaultProxy enabled="false" useDefaultCredentials="false"> 
  <proxy/> 
  <bypasslist/> 
  <module/> 
 </defaultProxy> 
</system.net> 

Next interesting thing (warning: a lot of chars, stacktrace included):
System.Net Information: 0 : [16392] SecureChannel#28372289 - We have user-provided certificates. The server has specified 4 issuer(s). Looking for certificates that match any of the issuers.
    DateTime=2012-05-23T15:33:20.3010355Z
    Callstack=   at System.Environment.GetStackTrace(Exception e, Boolean needFileInfo)
   at System.Environment.get_StackTrace()
   at System.Diagnostics.TraceEventCache.get_Callstack()
   at System.Diagnostics.TraceListener.WriteFooter(TraceEventCache eventCache)
   at System.Diagnostics.TraceSource.TraceEvent(TraceEventType eventType, Int32 id, String message)
   at System.Net.Logging.PrintLine(TraceSource traceSource, TraceEventType eventType, Int32 id, String msg)
   at System.Net.Logging.PrintInfo(TraceSource traceSource, Object obj, String msg)
   at System.Net.Security.SecureChannel.AcquireClientCredentials(Byte[]& thumbPrint)
   at System.Net.Security.SecureChannel.GenerateToken(Byte[] input, Int32 offset, Int32 count, Byte[]& output)
   at System.Net.Security.SslState.StartSendBlob(Byte[] incoming, Int32 count, AsyncProtocolRequest asyncRequest)
   at System.Net.Security.SslState.ProcessReceivedBlob(Byte[] buffer, Int32 count, AsyncProtocolRequest asyncRequest)
   at System.Net.Security.SslState.StartReceiveBlob(Byte[] buffer, AsyncProtocolRequest asyncRequest)
   at System.Net.Security.SslState.StartSendBlob(Byte[] incoming, Int32 count, AsyncProtocolRequest asyncRequest)
   at System.Net.Security.SslState.ForceAuthentication(Boolean receiveFirst, Byte[] buffer, AsyncProtocolRequest asyncRequest)
   at System.Net.Security.SslState.ProcessAuthentication(LazyAsyncResult lazyResult)
   at System.Threading.ExecutionContext.Run(ExecutionContext executionContext, ContextCallback callback, Object state, Boolean ignoreSyncCtx)
   at System.Threading.ExecutionContext.Run(ExecutionContext executionContext, ContextCallback callback, Object state)
   at System.Net.TlsStream.ProcessAuthentication(LazyAsyncResult result)
   at System.Net.TlsStream.Write(Byte[] buffer, Int32 offset, Int32 size)
   at System.Net.PooledStream.Write(Byte[] buffer, Int32 offset, Int32 size)
   at System.Net.ConnectStream.WriteHeaders(Boolean async)
   at System.Net.HttpWebRequest.EndSubmitRequest()
   at System.Net.Connection.CompleteConnection(Boolean async, HttpWebRequest request)
   at System.Net.Connection.CompleteStartConnection(Boolean async, HttpWebRequest httpWebRequest)
   at System.Net.Connection.CompleteStartRequest(Boolean onSubmitThread, HttpWebRequest request, TriState needReConnect)
   at System.Net.Connection.SubmitRequest(HttpWebRequest request, Boolean forcedsubmit)
   at System.Net.ServicePoint.SubmitRequest(HttpWebRequest request, String connName)
   at System.Net.HttpWebRequest.SubmitRequest(ServicePoint servicePoint)
   at System.Net.HttpWebRequest.GetRequestStream(TransportContext& context)
   at System.Net.HttpWebRequest.GetRequestStream()
   at TestConnection.Program.Main(String[] args)
System.Net Information: 0 : [16392] SecureChannel#28372289 - Selected certificate: [Version]
  V3
[Subject]
-------------------------------- CERTIFICATE DETAILS ------------------------------------
    DateTime=2012-05-23T15:33:35.3242207Z
    Callstack=   at System.Environment.GetStackTrace(Exception e, Boolean needFileInfo)
   at System.Environment.get_StackTrace()
   at System.Diagnostics.TraceEventCache.get_Callstack()
   at System.Diagnostics.TraceListener.WriteFooter(TraceEventCache eventCache)
   at System.Diagnostics.TraceSource.TraceEvent(TraceEventType eventType, Int32 id, String message)
   at System.Net.Logging.PrintLine(TraceSource traceSource, TraceEventType eventType, Int32 id, String msg)
   at System.Net.Logging.PrintInfo(TraceSource traceSource, Object obj, String msg)
   at System.Net.Security.SecureChannel.AcquireClientCredentials(Byte[]& thumbPrint)
   at System.Net.Security.SecureChannel.GenerateToken(Byte[] input, Int32 offset, Int32 count, Byte[]& output)
   at System.Net.Security.SslState.StartSendBlob(Byte[] incoming, Int32 count, AsyncProtocolRequest asyncRequest)
   at System.Net.Security.SslState.ProcessReceivedBlob(Byte[] buffer, Int32 count, AsyncProtocolRequest asyncRequest)
   at System.Net.Security.SslState.StartReceiveBlob(Byte[] buffer, AsyncProtocolRequest asyncRequest)
   at System.Net.Security.SslState.StartSendBlob(Byte[] incoming, Int32 count, AsyncProtocolRequest asyncRequest)
   at System.Net.Security.SslState.ProcessReceivedBlob(Byte[] buffer, Int32 count, AsyncProtocolRequest asyncRequest)
   at System.Net.Security.SslState.StartReceiveBlob(Byte[] buffer, AsyncProtocolRequest asyncRequest)
   at System.Net.Security.SslState.StartSendBlob(Byte[] incoming, Int32 count, AsyncProtocolRequest asyncRequest)
   at System.Net.Security.SslState.ProcessReceivedBlob(Byte[] buffer, Int32 count, AsyncProtocolRequest asyncRequest)
   at System.Net.Security.SslState.StartReceiveBlob(Byte[] buffer, AsyncProtocolRequest asyncRequest)
   at System.Net.Security.SslState.StartSendBlob(Byte[] incoming, Int32 count, AsyncProtocolRequest asyncRequest)
   at System.Net.Security.SslState.ForceAuthentication(Boolean receiveFirst, Byte[] buffer, AsyncProtocolRequest asyncRequest)
   at System.Net.Security.SslState.ProcessAuthentication(LazyAsyncResult lazyResult)
   at System.Threading.ExecutionContext.Run(ExecutionContext executionContext, ContextCallback callback, Object state, Boolean ignoreSyncCtx)
   at System.Threading.ExecutionContext.Run(ExecutionContext executionContext, ContextCallback callback, Object state)
   at System.Net.TlsStream.ProcessAuthentication(LazyAsyncResult result)
   at System.Net.TlsStream.Write(Byte[] buffer, Int32 offset, Int32 size)
   at System.Net.PooledStream.Write(Byte[] buffer, Int32 offset, Int32 size)
   at System.Net.ConnectStream.WriteHeaders(Boolean async)
   at System.Net.HttpWebRequest.EndSubmitRequest()
   at System.Net.Connection.CompleteConnection(Boolean async, HttpWebRequest request)
   at System.Net.Connection.CompleteStartConnection(Boolean async, HttpWebRequest httpWebRequest)
   at System.Net.Connection.CompleteStartRequest(Boolean onSubmitThread, HttpWebRequest request, TriState needReConnect)
   at System.Net.Connection.SubmitRequest(HttpWebRequest request, Boolean forcedsubmit)
   at System.Net.ServicePoint.SubmitRequest(HttpWebRequest request, String connName)
   at System.Net.HttpWebRequest.SubmitRequest(ServicePoint servicePoint)
   at System.Net.HttpWebRequest.GetRequestStream(TransportContext& context)
   at System.Net.HttpWebRequest.GetRequestStream()
   at TestConnection.Program.Main(String[] args)

You can see 15sec gap here. Now I suggest you to enable .NET source debugging. Also there is a big chanses that PDBs on MS Source Server are of different version of .NET, so you can use Reflector with VS Addin, to generate PDBs of neccessary DLLs. After that done, you can start debugging and dig into depth of .NET. You should be interested in (see line 70 on log dump above):
SecureChannel.AcquireClientCredentials()

After analysing that method you can find call to:

X509Chain.Build()


This method internally calls Windows Crypto API, function CertGetCertificateChain:
if (!CAPISafe.CertGetCertificateChain(hChainEngine, pCertContext, ref pTime, invalidHandle, ref cert_chain_para, dwFlags, IntPtr.Zero, ref ppChainContext))

That is defined as:

[DllImport("crypt32.dll", CharSet = CharSet.Auto, SetLastError = true)] 
internal static extern bool CertGetCertificateChain([In] IntPtr hChainEngine, [In] SafeCertContextHandle pCertContext, [In] ref System.Runtime.InteropServices.ComTypes.FILETIME pTime, [In] SafeCertStoreHandle hAdditionalStore, [In] ref CAPIBase.CERT_CHAIN_PARA pChainPara, [In] uint dwFlags, [In] IntPtr pvReserved, [In, Out] ref SafeCertChainHandle ppChainContext);

This function, among other certificate checks, performs check of every certificate in the chain to see if it was revoked. In order to check the current revocation status, it needs up-to-date information from a CRL or an OCSP responder. If the correct CRL isn't provided explicitly during the setup of the path validation request, it can try to fetch it (usually over the Internet) if a URL for the CRL is listed in the "CRL Distribution Points" extension.
This can take some time if network connection is slow, the path is long, or the CRLs are large.
Alternatively, it might automatically contact an OCSP responder if it is advertised in the "Authority Information Access" extension.

* Description above, about CRL and OCSP was taken from answer to my question on stackoverflow. Answer was written by Erikson. Thank you very much!

You can try to disable CRL and OCSP checks in several ways (but it is not recommended):
  1. In configuration file, <configuration> section add (KB936707):
    <runtime> 
      <generatePublisherEvidence enabled="false"/> 
    </runtime>
    
  2. Machine-wide: Control Panel -> Internet Options -> Advanced -> under Security tab, uncheck the "Check for publisher's certificate revocation option" (EricLaw's IEInternals)
  3. In registry (there is Windows API function for that WintrustSetRegPolicyFlags):
    [HKEY_USERS\S-1-5-20\Software\Microsoft\Windows\CurrentVersion\WinTrust\Trust Providers\Software Publishing] "State"=dword:00023e00
    
I tried all mentioned variants, but still had delays. So I go to Event log and enabled CAPI2 logging. You can read how to do it on the Windows PKI blog. And after all the investigations I found several Error entries with message:

<CryptRetrieveObjectByUrlWire>
  <URL scheme="http">http://www.download.windowsupdate.com/msdownload/update/v3/static/trustedr/en/authrootstl.cab</URL> 
  <Object type="Blob" constant="0" /> 
  <Timeout>PT15S</Timeout> 
  <Flags value="205004" CRYPT_WIRE_ONLY_RETRIEVAL="true" CRYPT_STICKY_CACHE_RETRIEVAL="true" CRYPT_OFFLINE_CHECK_RETRIEVAL="true" CRYPT_PROXY_CACHE_RETRIEVAL="true" /> 
  <AdditionalInfo>
    <Action name="NetworkRetrievalTimeout">
      <Error value="5B4">This operation returned because the timeout period expired.</Error> 
    </Action>
  </AdditionalInfo>
  <EventAuxInfo ProcessName="TestConnection.exe" /> 
  <CorrelationAuxInfo TaskId="{D8E01E93-CCAB-41C8-B227-08F5A838B72D}" SeqNumber="8" /> 
  <Result value="5B4">This operation returned because the timeout period expired.</Result> 
</CryptRetrieveObjectByUrlWire>

Wow! Application tries to download Certificate Trust List and seems like it is strict FW rules that denies access to Windows Update site. So I enabled access to all URLs that I found in CAPI2 event logs. To recheck and find list of possible IPs, you can use Process Explorer from Mark Russinovich, Sysinternals. Just open properties of your process, go to TCP\IP tab, and initiate certificate check.

That's it, it was a long jorney.. BTW, depending on your certificates and FW rules, you can check next URLs:


Hope this blog post saves your time and money :)


Shout it

kick it on DotNetKicks.com

2.21.2012

Entity Framework (Code First): the easy way to run stored procedures

Hello,

an ordinal way to execute stored procedure in EF CF is something like this:

public Product GetProduct(int id)
{
    Product product = null;

    using (var context = new NorthwindData())
    {
        string query = "Product_GetByID @productId";
        SqlParameter productId = new SqlParameter("@productId", id);

        product = context.Database.SqlQuery<Product>(query, productId).FirstOrDefault();
    }

    return product;
}

If you have more parameters for SP, you should specify all of them. Sometimes it's boring... So, I wrote several simple extensions to Database class to simplify this task.

See code below how GetProduct method will look like when using extensions:

public Product GetProduct(int id)
{
    Product product = null;

    using (var context = new NorthwindData())
    {
        product = context.Database.SqlQuerySmart<Product>("Product_GetByID", new
        {
            productId = id
        }).FirstOrDefault();
    }

    return product;
}

As you can see, you just create anonymous type with fields that has names exactly as parameters of SP and extension takes care about correct SQL code and other things. But, extension works only in simple cases, when there are no OUT parameters in SP.

Code of extension provided below, enjoy!

using System;
using System.Collections;
using System.Collections.Generic;
using System.Data.Entity;
using System.Data.SqlClient;
using System.Reflection;

namespace HennadiyKurabko.Data.EF
{
    public static class Extensions
    {
        public static int ExecuteSqlCommandSmart(this Database self, string storedProcedure, object parameters = null)
        {
            if (self == null)
                throw new ArgumentNullException("self");
            if (string.IsNullOrEmpty(storedProcedure))
                throw new ArgumentException("storedProcedure");

            var arguments = PrepareArguments(storedProcedure, parameters);
            return self.ExecuteSqlCommand(arguments.Item1, arguments.Item2);
        }

        public static IEnumerable<TElement> SqlQuerySmart<TElement>(this Database self, string storedProcedure, object parameters = null)
        {
            if (self == null)
                throw new ArgumentNullException("self");
            if (string.IsNullOrEmpty(storedProcedure))
                throw new ArgumentException("storedProcedure");

            var arguments = PrepareArguments(storedProcedure, parameters);
            return self.SqlQuery<TElement>(arguments.Item1, arguments.Item2);
        }

        public static IEnumerable SqlQuerySmart(this Database self, Type elementType, string storedProcedure, object parameters = null)
        {
            if (self == null)
                throw new ArgumentNullException("self");
            if (elementType == null)
                throw new ArgumentNullException("elementType");
            if (string.IsNullOrEmpty(storedProcedure))
                throw new ArgumentException("storedProcedure");

            var arguments = PrepareArguments(storedProcedure, parameters);
            return self.SqlQuery(elementType, arguments.Item1, arguments.Item2);
        }

        private static Tuple<string, object[]> PrepareArguments(string storedProcedure, object parameters)
        {
            var parameterNames = new List<string>();
            var parameterParameters = new List<object>();

            if (parameters != null)
            {
                foreach (PropertyInfo propertyInfo in parameters.GetType().GetProperties())
                {
                    string name = "@" + propertyInfo.Name;
                    object value = propertyInfo.GetValue(parameters, null);

                    parameterNames.Add(name);
                    parameterParameters.Add(new SqlParameter(name, value ?? DBNull.Value));
                }
            }

            if (parameterNames.Count > 0)
                storedProcedure += " " + string.Join(", ", parameterNames);

            return new Tuple<string, object[]>(storedProcedure, parameterParameters.ToArray());
        }
    }
}

Shout it

kick it on DotNetKicks.com

1.11.2012

How to configure FATAR Studiologic VMK 188 Plus to work under FL Studio

Hi all,

today I want to tell you not about software development, but about music, yeah..
So, you bought MIDI keyboard - FATAR Studiologic VMK 188 Plus - and want to use it in FL Studio.


There are several steps to do so:

1. Configure keyboard in FL Studio.
2. Configure ASIO4ALL to minimize delays (optional).
3. Configure preset on MIDI keyboard to enable pedals and "Transport control".


Configure keyboard in FL Studio.


Configuration of FL Studio to work with MIDI keyboard.
Picture 1 - Configuration of FL Studio to work with MIDI keyboard.

  1. Open Options menu and check Enable MIDI remote control item.
  2. Open Options menu and press MIDI settings item (or just press F10) so Settings tool window will be displayed with active MIDI tab.
  3. Press Rescan MIDI devices button to make sure that keyboard detected and responsive.
  4. Select device in the list and check that Enable is selected. So device has state Active.
  5. Check that Controller type is (generic controller) (it is common type that will work with different keyboards but without some advanced features).
  6. About other available options, please read help file for FL Studio, section System Settings - MIDI.

That's all, now you should be able to play on your keyboard. You can check small rounded box that normally has grey color, to see that signal from MIDI keyboard actually goes to FL Studio - box changes color to orange (see image below).

FL Studio has signal from MIDI keyboard.
Picture 1a - FL Studio has signal from MIDI keyboard.


Configure ASIO4ALL to minimize delays (optional).


If you have your MIDI keyboard connected to PC via USB, you probably will notice a delay between you press some key and actual sound from PC.

It is because buffer of sound card driver is long, and driver waits when it will be full to push it into processing. This waiting is not infinite, partially filled buffer can be pushed into processing by timeout. But this timeout is not your friend, that is why you have a delay.
You can download and install ASIO4ALL driver and use it to manually set buffer length and minimize latencies.

After installation (usually I use default options during installation), you should tell FL Studio to use ASIO4ALL driver:


Configure ASIO4ALL in FL Studio
Picture 2 - Configure ASIO4ALL in FL Studio


  1. Open Options menu and press Audio settings item so Settings tool window will be displayed with active Audio tab.
  2. Select ASIO4ALL in combo box.
  3. Press Show ASIO panel button, to open ASIO4ALL control panel.
  4. Set preferred buffer size using slider (small buffer - sound can be "cutted" by buffer overflows; big buffer - good sound, but bigger delays).

Configure preset on MIDI keyboard to enable pedals and "Transport control"


To use Transport control feature and all 3 pedals, you should manually create preset on keyboard for FL Studio.


  1. Using Data entry knob select free preset (for example preset #12) and press Enter button to confirm your selection.
  2. Press Edit button, to enter edit-mode. In this mode light diode on Edit button should be turned on. On display you should see message: Press Or Move Any Controls.
  3. Now slightly move P1 knob to enter Knobs Edit mode. In this mode you can use Page buttons to cycle through settings, and Data entry knob to change setting value. Then press Enter button to go back to edit mode. Use next configurations for knobs:
    MIDI channel:1
    Polarity:DN -> UP
    Value Min:0
    Value Max:127
    CTRL:111 - 118
  4. Now slightly move V1 slider to enter Slider Edit mode. Use next configurations for sliders:
    MIDI channel:1
    Polarity:DN -> UP
    Value Min:0
    Value Max:127
    CTRL:102 - 110
  5. For buttons you can use next configurations:
    MIDI channel:1
    Key mode:SWITCH (or PUSH, depends what you need)
    Key note:127
    CTRL:14, 15, 26 - 31
  6. For Transport control buttons use next configurations:
    MIDI channel:1
    Key mode:PUSH
    Key note:127
    CTRL:
    REW24
    FF25
    REC23
    PLAY22
    STOP21
  7. For pedals use next configurations:
    MIDI channel:1
    Polarity:UP -> DN
    Value min:0
    Value max:127
    CTRL:
    Pedal 1 (soft):67
    Pedal 2 (sostenuto):66
    Pedal 3 (sustain):64
  8. Now you can press Storage button, and answer Yes (by pressing Enter) on question "Store parameters".
  9. Select preset # using Data entry knob, then press Page Down button to go to preset name. Again use Data entry to select character and Page buttons to jumb between charactes.
  10. Finally press Storage button again, and answer Yes (by pressing Enter) on question "Are you sure?".

Cool you have your preset, now we should change Controller type setting in FL Studio -> Options menu -> MIDI Settings -> MIDI tab -> your device selected -> Controller type to Tascam US-428. It is small hack that should be done for FL Studio, to make it understand our CTRL codes configured in the preset (see picture below).

Change controller type in FL Studio
Picture 3 - Change controller type in FL Studio.